WooCommerce Event Manager: Run Events From Your Store (2026)
Your WooCommerce store already handles payments and accounts. Here's how to add a full event calendar with ticket sales, QR check-in, and PDF tickets.

Most store owners don’t realize their WooCommerce setup already handles 80% of what an event management platform does. You have payment gateways. Customer accounts. Order tracking. Email notifications. Tax configuration. Coupon codes.
The only thing missing is the event layer: dates, venues, calendars, ticket check-in, and PDF tickets.
The good news: you don’t need to set up a separate platform, pay per-ticket fees, or send your customers to a third-party checkout page. A single plugin turns your existing WooCommerce store into a full event management system.
We build WordPress plugins (including an event manager plugin), so we’ve tested this workflow inside and out. This guide walks through the entire setup, from creating your first event to scanning QR codes at the door.
Why manage events from WooCommerce?#
If you’re already running a WooCommerce store, adding a separate event platform creates unnecessary friction:
You already have payments sorted. Stripe, PayPal, bank transfers. Whatever gateways you use for products work identically for tickets. No new payment integrations to configure. No extra merchant accounts.
Customer data stays yours. Attendees create accounts on your site, not on Eventbrite or Ticketmaster. Purchase history, email addresses, and preferences all live in your WooCommerce database. You own the relationship.
One dashboard for everything. Products, orders, tickets, attendees, and revenue, all in the same WordPress admin. No switching between systems or reconciling data from two platforms.
WooCommerce features apply automatically. Coupon codes work on tickets. Tax rules apply correctly. You can set up dynamic pricing for early bird discounts and other ticket pricing strategies. Your existing email templates handle order confirmations. Everything you’ve already configured just works.
No percentage-based fees. Third-party platforms charge 3–10% per ticket. A self-hosted plugin has a flat annual cost regardless of how many tickets you sell.
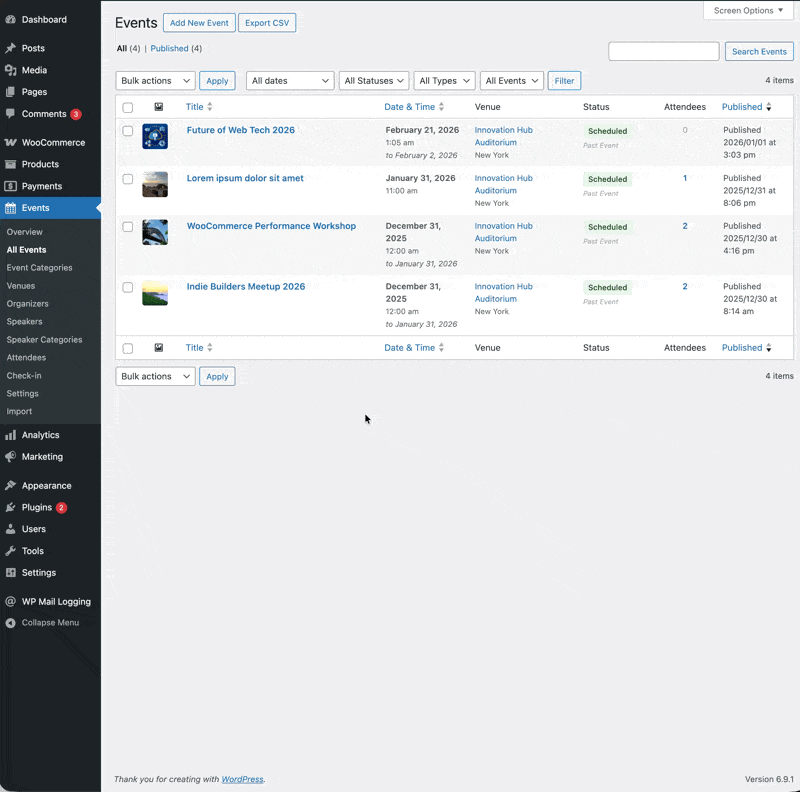
Setting up your first event#
This walkthrough uses Evenzo – Events Manager for WooCommerce. Full disclosure, it’s our plugin (free on WordPress.org). The general concepts apply to most WooCommerce event plugins, but the specific menu locations and settings are from our tool.
Step 1: Create the event#
Go to Events > Add New in your WordPress admin. You’ll see fields for:
- Title and description: the event name and full details (supports the classic editor with formatting).
- Start and end date/time: or check “All day event” for events without specific times.
- Timezone: defaults to your WordPress timezone, override for events in other locations.
- Event type: choose In-person, Virtual, or Hybrid.
- Venue: for in-person events, select or create a venue with address and map.
- Virtual URL: for online events, add a meeting link (shown only to registered attendees).
- Capacity: maximum attendees, leave empty for unlimited.
- Registration deadline: cut off ticket sales before the event starts.
You can also assign an organizer, add speakers with photos and bios, set categories and tags for filtering, and mark events as Featured to highlight them on your site.
Click Publish and the event goes live on your site, but without tickets, visitors can only view the details, not register.
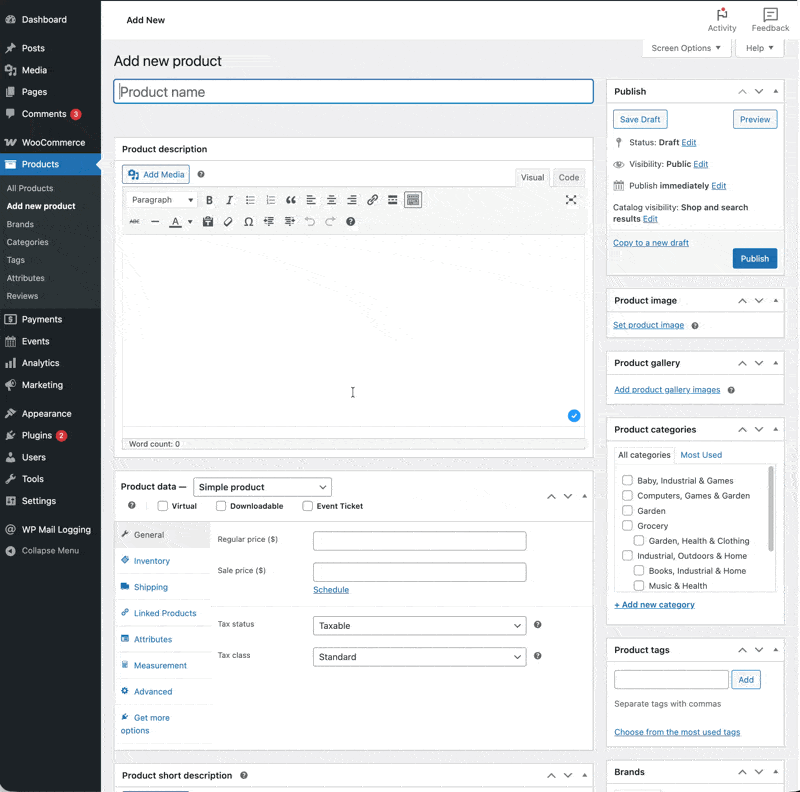
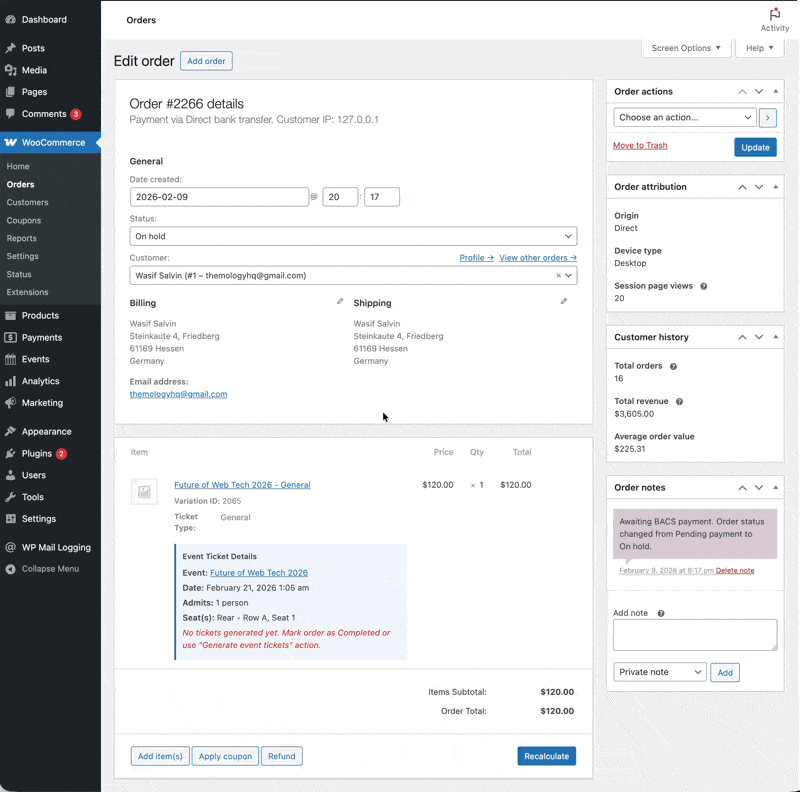
Step 2: Create a ticket product#
This is where WooCommerce integration matters. Tickets are standard WooCommerce products with an event layer on top.
- Go to Products > Add New.
- Name the product (e.g., “General Admission: Spring Workshop”).
- Set the price.
- In Product Data, check Event Ticket; the product automatically sets to Virtual.
- Click the Event Ticket tab that appears.
- Select your event from the dropdown.
- Configure quantity controls: minimum per order, maximum per order, and persons per ticket (for group tickets).
- Set optional sales start/end dates. Customers see “Coming Soon” before sales open and “Sales Ended” after they close.
- Click Publish.
Multiple ticket types? Use a WooCommerce Variable product. Create variations like General Admission, VIP, and Student, each with its own price. In each variation’s Event Ticket settings, link to the same event. Customers see a dropdown on the product page.
Collecting attendee details? Check “Collect attendee information” in the ticket settings and add fields: text, email, phone, dropdown, textarea, or checkbox. For “per ticket” collection, fields repeat for each ticket in the order. This data appears in the attendee record after purchase.
Step 3: Test the full flow#
Before promoting your event:
- Visit the event page on your site.
- Add a ticket to the cart.
- Complete checkout (use a test payment method).
- Check Events > Attendees to confirm the attendee record was created.
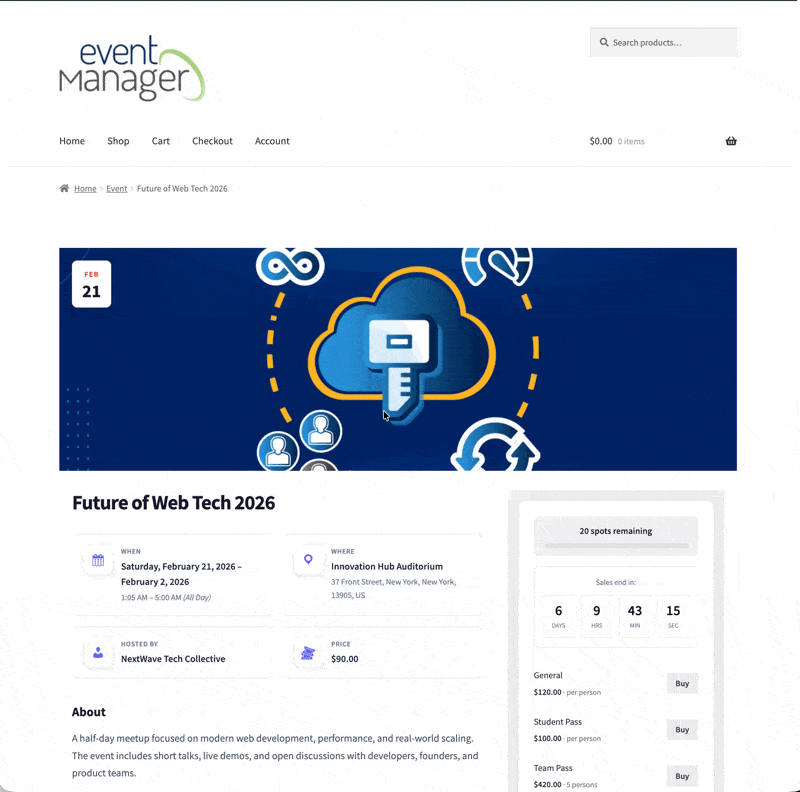
- Go to My Account > My Tickets to see what the customer sees: ticket details, QR code on screen, and a Print Ticket button for PDF.
The checkout experience is your standard WooCommerce checkout, Block Checkout or Classic. Attendee fields appear as an additional section. Every payment gateway you have configured works automatically.
Displaying an event calendar on your site#
Creating events is half the job. Displaying them well is the other half.
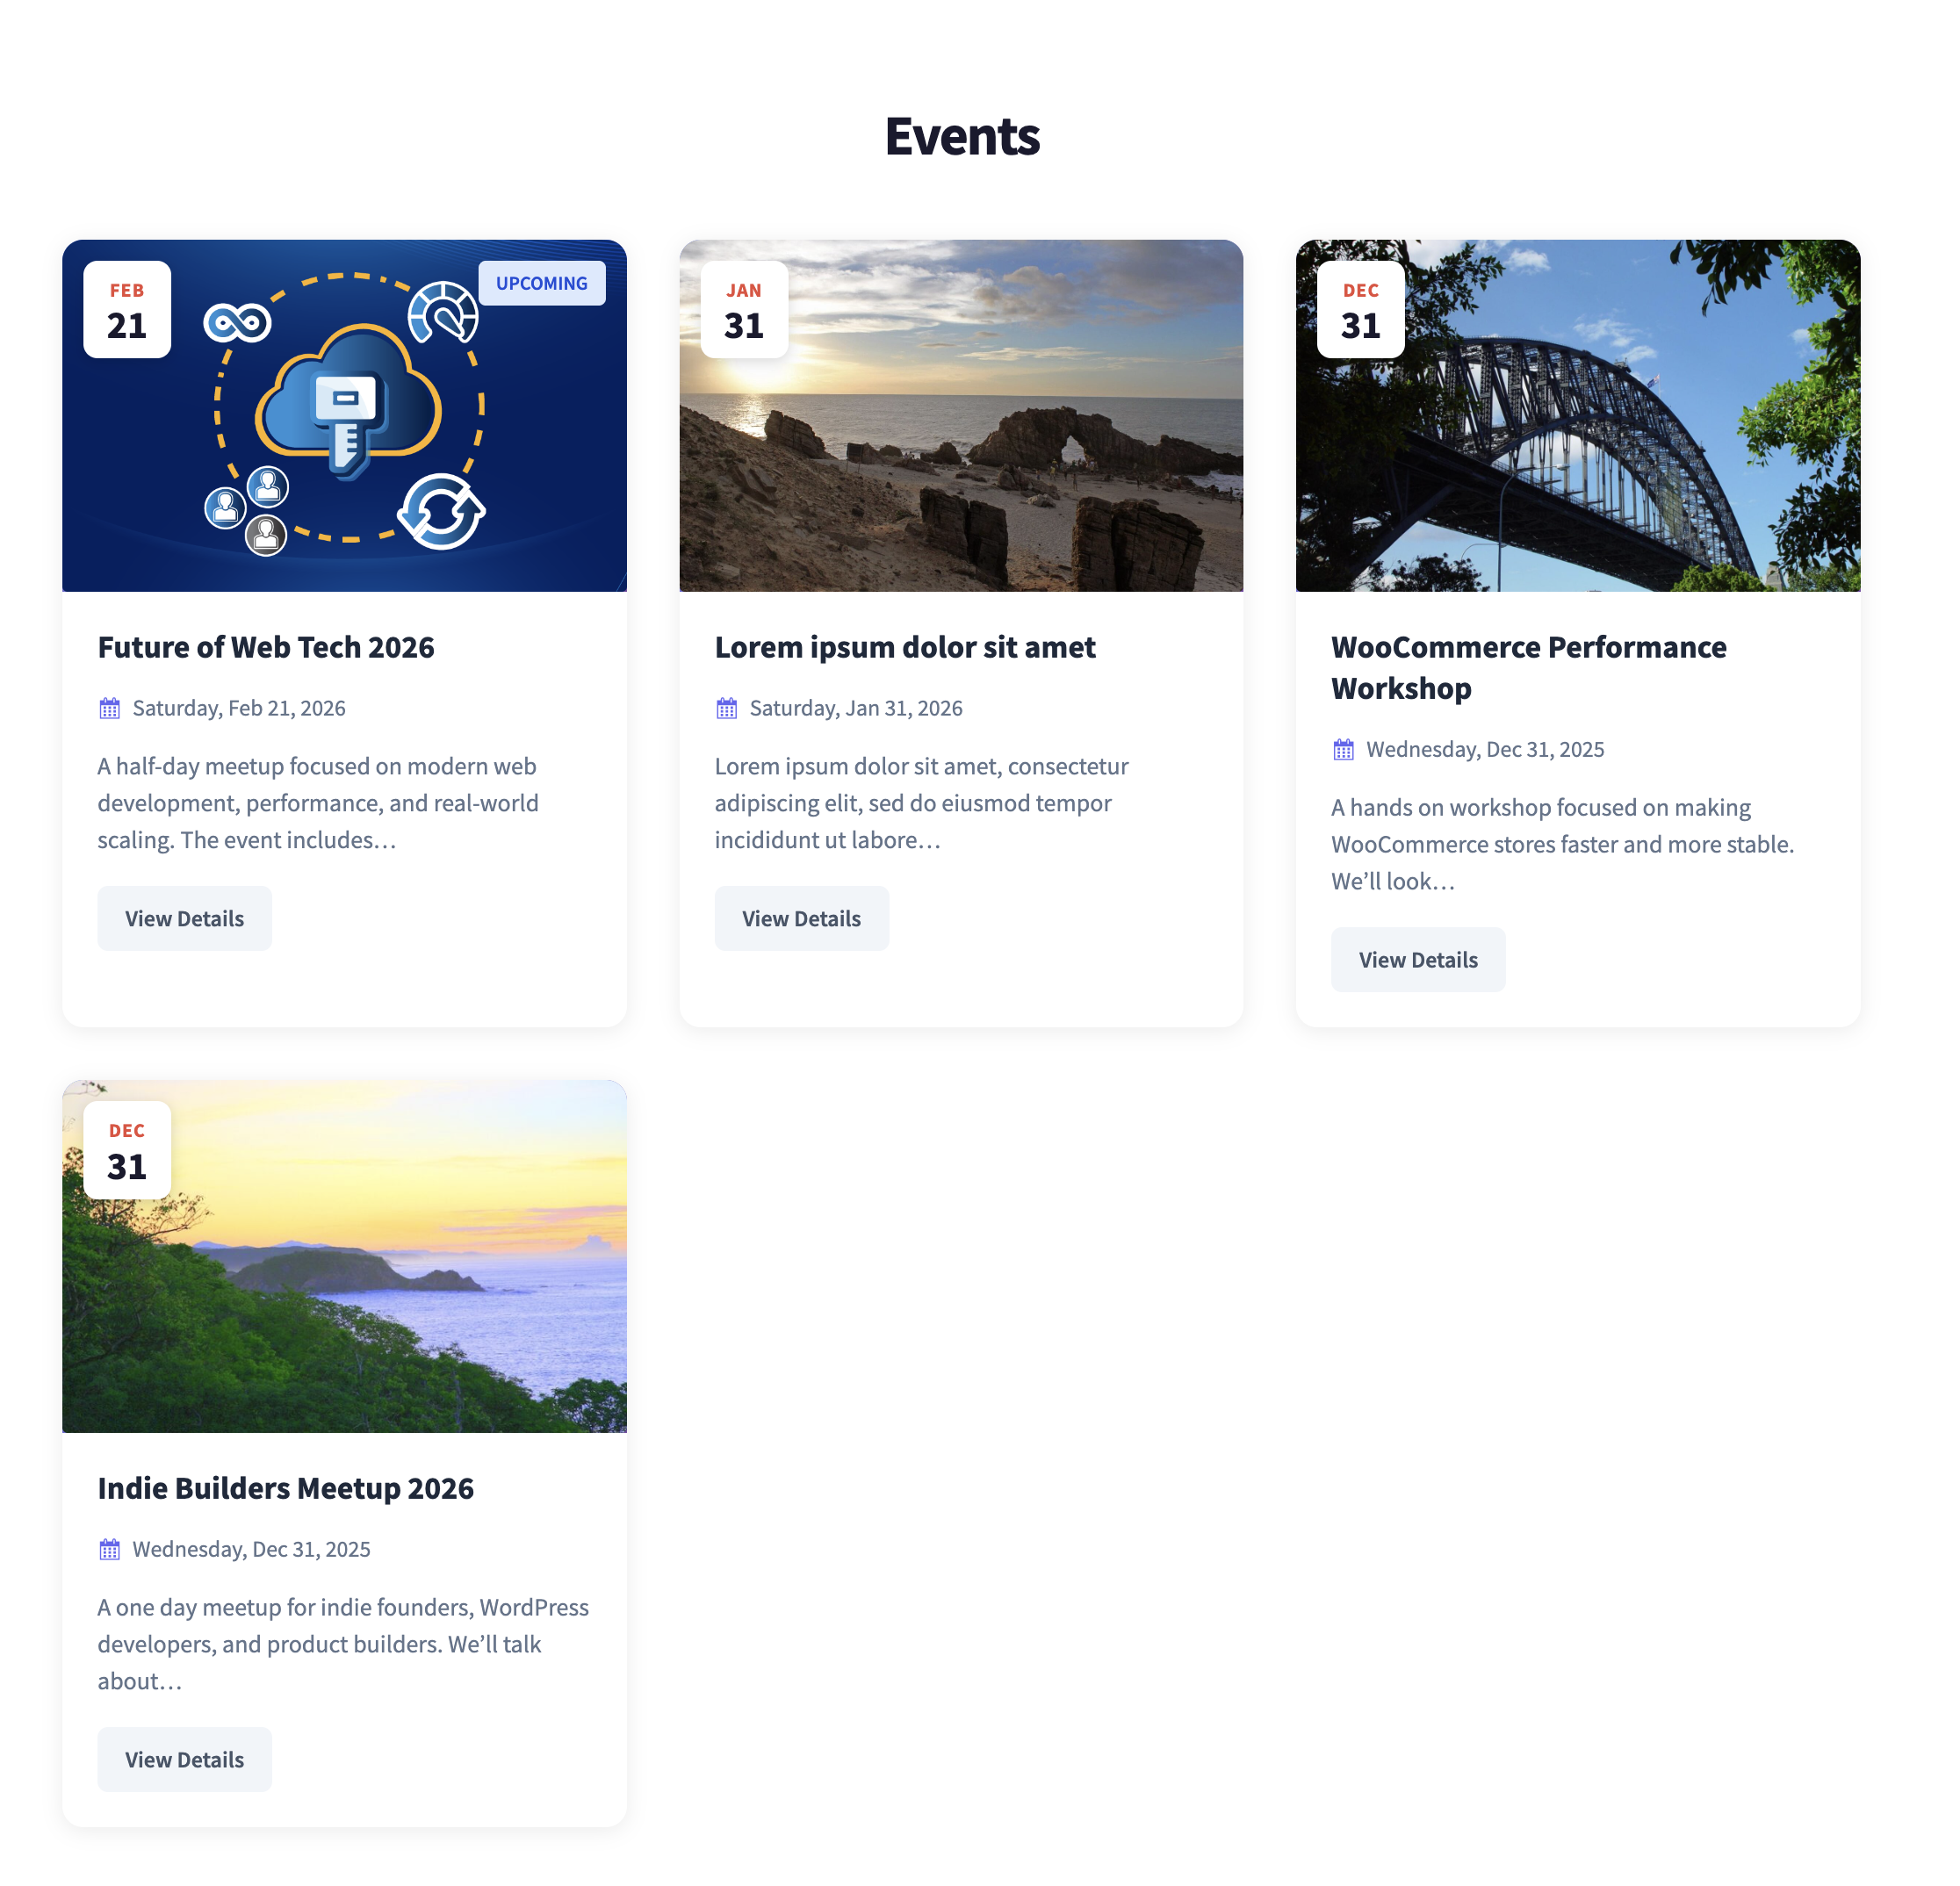
The built-in event archive#
Your plugin automatically creates an event archive at /event/ (or whatever URL slug you configure in Events > Settings). This archive page shows:
- Grid layout with event cards
- Featured images, dates, and venue names
- Event status badges
- Category filtering
- Pagination
You can control the display in Events > Settings > Display: events per page, sort order, whether to show past events.
Speaker archive#
If your events include speakers, the plugin creates a speaker archive page too. Speaker profiles with photos, bios, and their associated events are listed in one place, useful for conferences and workshop series where speakers appear at multiple events.

Custom archive pages#
If the default archive doesn’t fit your design, create your own. Make any WordPress page and drop in a shortcode:
[emwc_events limit="12" columns="3" layout="grid"]Or use the Events List Gutenberg block with the same options. Then in Events > Settings, point the archive to your custom page instead of the default.
This gives you full control over what appears above and below the event listing. Add intro text, featured banners, sponsor logos, whatever your page needs.
Calendar view#
For a traditional month-view calendar with events on their dates:
Gutenberg Block: Add the “Event Calendar” block from the Events Manager category. Configure initial view (month or list), category filter, and whether to show a “Today” button.
Shortcode:
[emwc_calendar view="month" category="workshops" show_today="yes"]Visitors can navigate between months, click dates to see that day’s events in a popup, and filter by category. The calendar also supports a list view, a chronological event listing with more detail per event.
Countdown timers#
Building anticipation for a specific event? Add the Event Countdown block to any page or post. Select the event, toggle which units to display (days, hours, minutes, seconds), and set a message for after the event starts.
Sidebar widgets#
Two widgets for sidebar areas:
- Upcoming Events: compact list of the next 5 (configurable) events.
- Mini Calendar: condensed monthly calendar.
Both support category filtering to show only relevant events.
Handling check-in on event day#
Printed guest lists and manual name-checking work for small events. They don’t scale. A proper QR-based check-in system saves time and eliminates the “is this ticket real?” question.
Browser-based QR scanning#
Go to Events > Check-in on any device with a camera: phone, tablet, or laptop. No app to download.
- Select the event from the dropdown.
- Click Start Scanner.
- Allow camera access.
- Point at a ticket’s QR code.
A successful scan shows a green confirmation with the attendee’s name. An already-used ticket shows red. Wrong event? Different error. Cancelled order? It catches that too.
The dashboard shows real-time statistics: total registered, checked in, remaining, and check-in rate percentage.
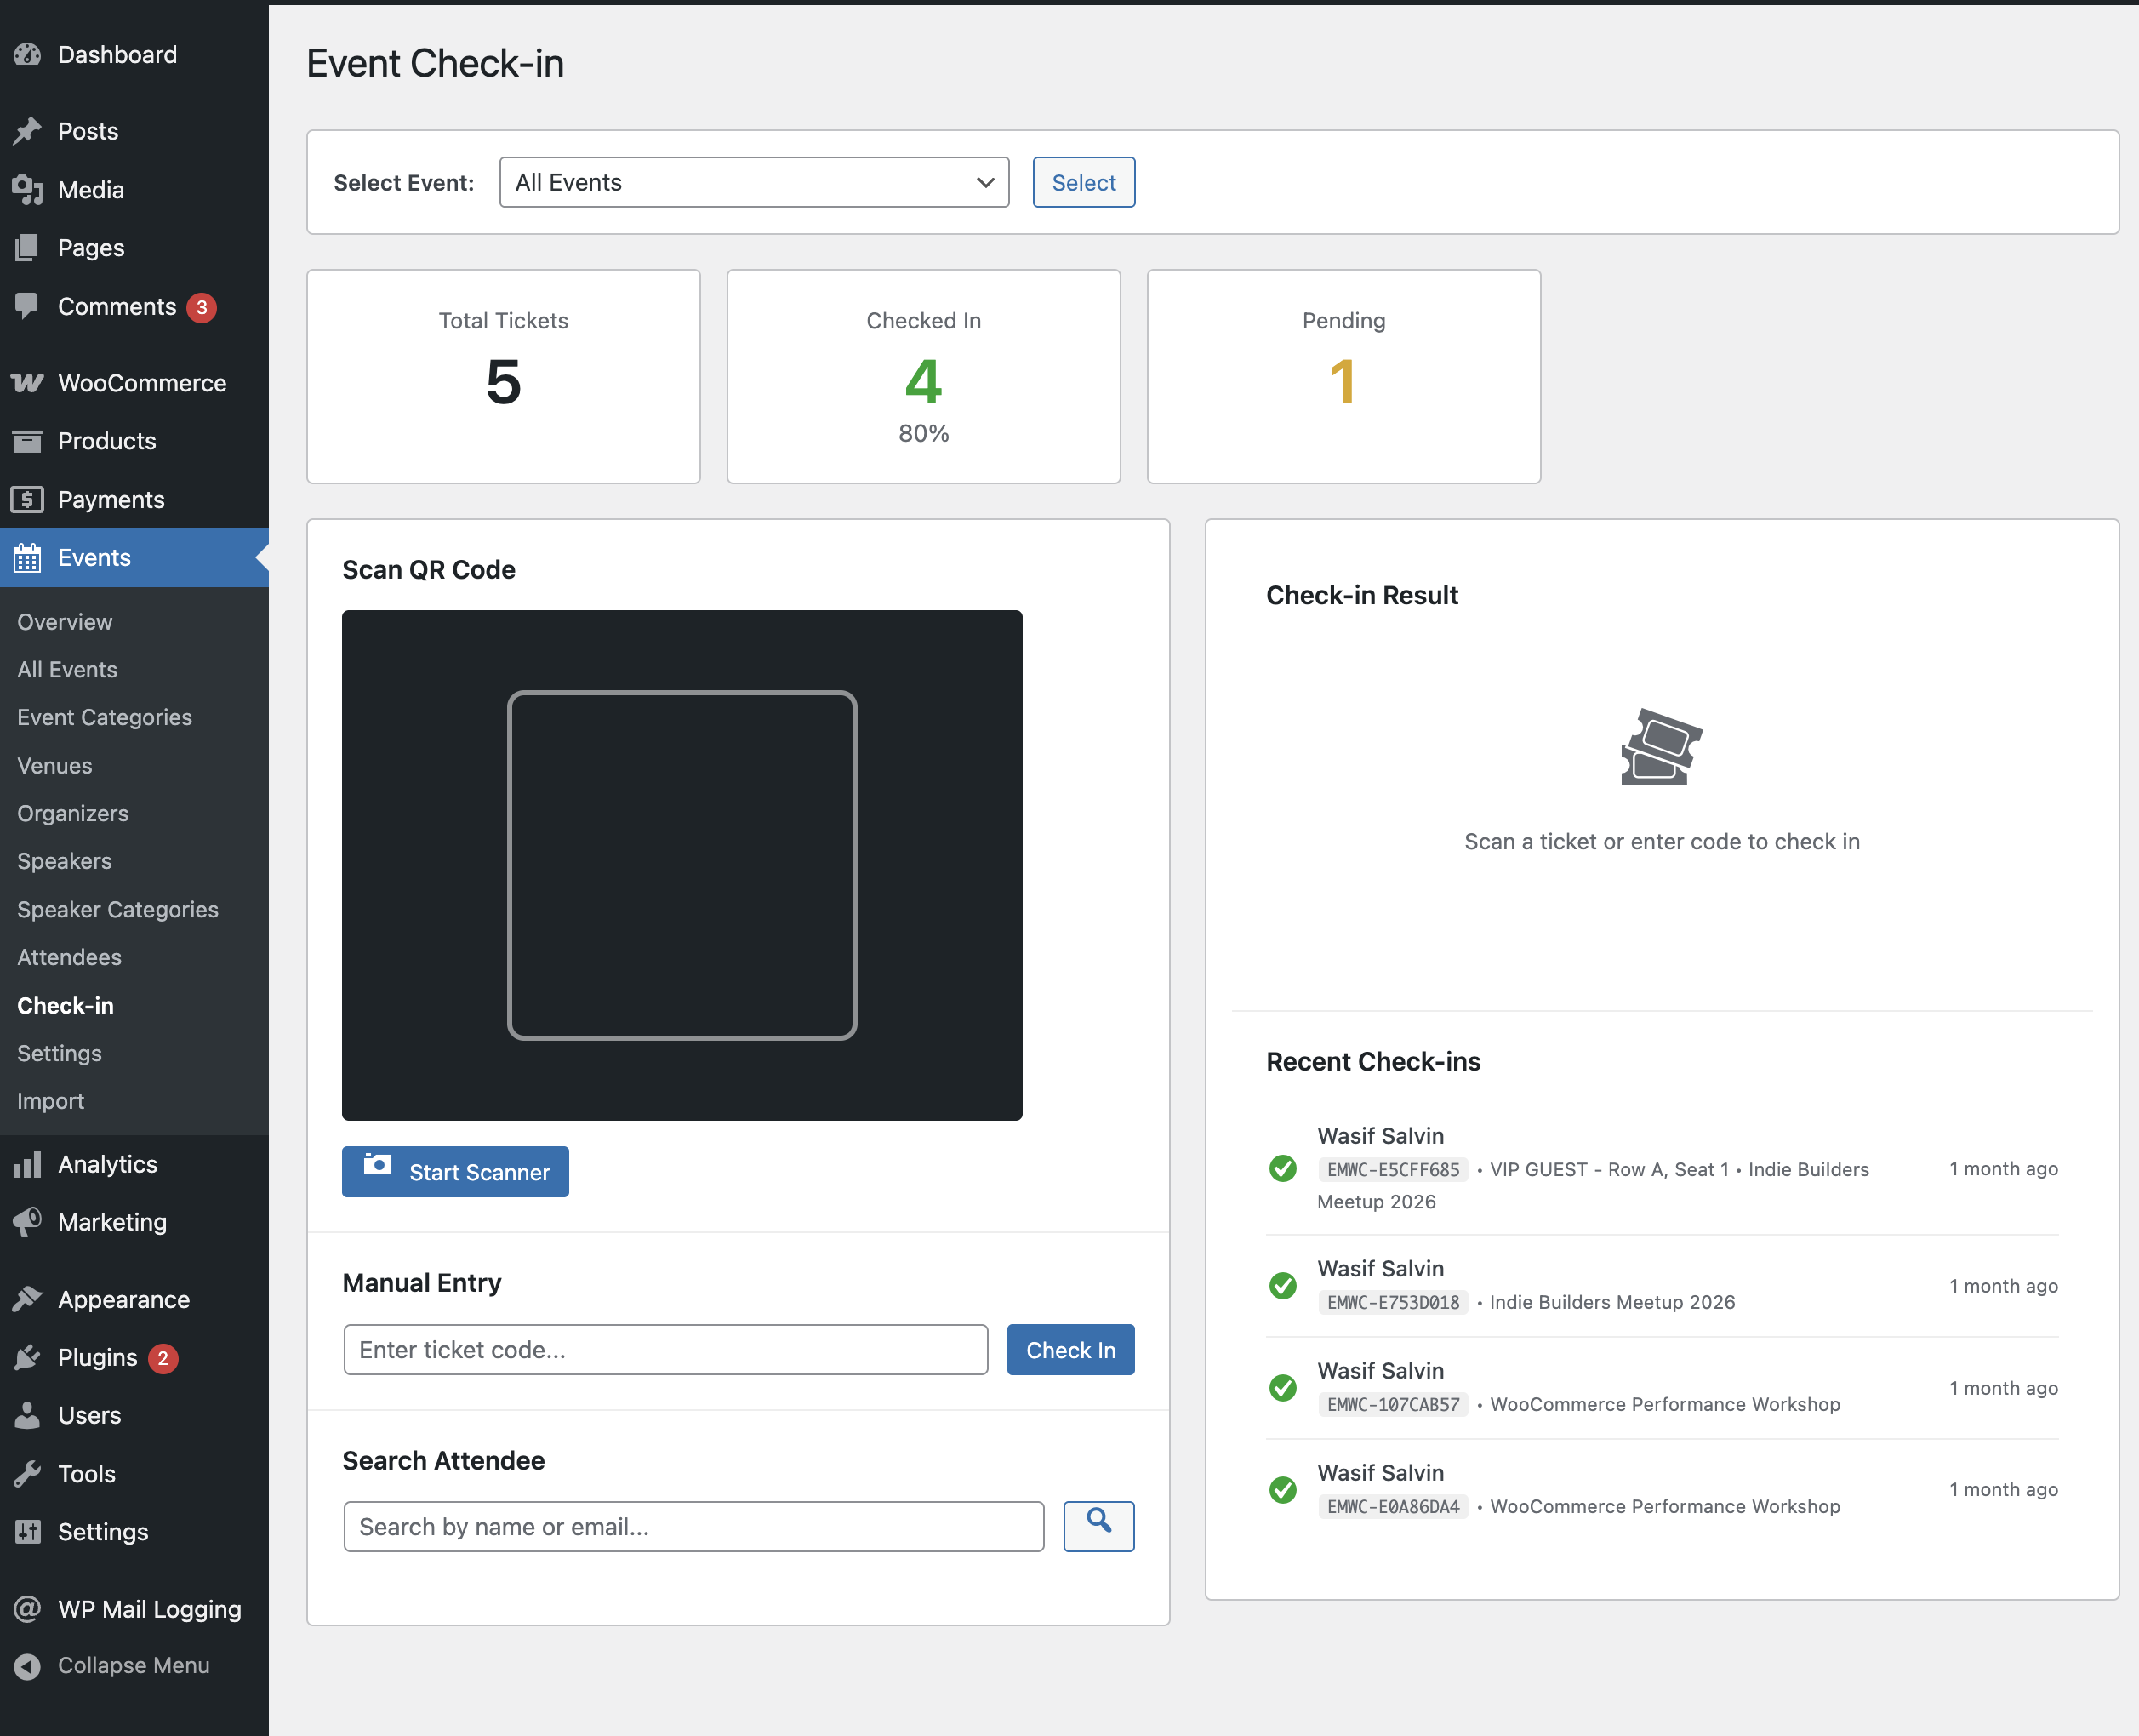
When scanning doesn’t work#
Sometimes phones die, tickets get forgotten, or lighting is terrible. Three fallback options:
- Manual entry: type the ticket code (format:
EMWC-ABC123DEF) directly. - Attendee search: search by name or email and check in manually.
- Offline backup: export attendee lists to CSV before the event and mark check-ins on paper, then update the system afterward with bulk actions.
Multiple check-in stations#
For larger events, set up multiple devices. Each one logs into WordPress, navigates to Events > Check-in, and selects the same event. Check-ins sync in real-time across all stations. Statistics update everywhere.
You can create a dedicated check-in role for volunteer staff. Grant only the emwc_checkin capability so they can scan tickets without accessing the rest of your admin.
PDF tickets and mobile tickets#
Every ticket purchase generates a unique ticket code and QR code automatically. Customers have two options:
Mobile tickets. Open My Account > My Tickets, display the QR code on screen. The check-in scanner reads it directly. No PDF needed.
Printed PDF tickets. Click “Print Ticket” from the same page. The PDF includes your site logo, event details (name, date, venue), attendee information, the QR code, and any ticket terms you’ve configured.
As an admin, you can download individual tickets from Events > Attendees or bulk download all tickets for an event as a ZIP file, useful for printing and mailing physical tickets.
Customizing ticket design#
The default ticket uses your WordPress site logo and theme’s primary color. To change the accent color, go to Events > Settings > Tickets and pick your brand color. No code needed.
For deeper layout changes, copy the ticket template to your theme folder and modify the HTML structure entirely.
Recurring events#
Running weekly workshops, monthly meetups, or annual conferences? Don’t create each occurrence manually.
- Create or edit an event.
- Check This is a recurring event.
- Set the pattern: daily, weekly (pick specific days), monthly (by date or by day position), or yearly.
- Set an interval: every 1 week, every 2 weeks, every 3 months.
- Set when to stop: after X occurrences, by a specific date, or indefinitely (up to 52 occurrences generated).
Each occurrence is a separate event linked to the parent. Edit the parent to change all future occurrences. Edit a single occurrence to change just that date: adjust the time, update the description, or cancel it without touching the rest of the series.
Exceptions let you skip specific dates (holidays, venue unavailability) without breaking the pattern.
Tickets for recurring events can work two ways: link one product to the parent (customers choose which date at purchase) or create separate products per occurrence (useful when pricing varies).

What about free options?#
If you’re testing the waters or running simple free events, two plugins offer genuinely useful free tiers:
Events Manager by Marcus Sykes has 70,000+ active installs. The free version covers calendars, locations, recurring events, and basic bookings. The Pro version adds payment processing (PayPal and Stripe via its own system, not WooCommerce), PDF tickets, and waitlists. Good for community sites. The WooCommerce integration exists as a separate add-on but hasn’t kept pace with modern WooCommerce; it’s rated 1.7/5 on the WooCommerce Marketplace.
The Events Calendar by StellarWP is the most popular WordPress event plugin with the largest community and best documentation. The free version is a powerful calendar without ticketing. Adding RSVP is free via Event Tickets. WooCommerce ticket sales require Event Tickets Plus ($99/year). Recurring events need Events Calendar Pro ($99/year). The ecosystem is proven at massive scale.
Both are solid starting points. Where they fall short for WooCommerce stores: Events Manager runs its own payment system (separate from your WooCommerce checkout), and The Events Calendar’s full WooCommerce feature set requires stacking multiple paid add-ons.
For a deeper comparison of all major plugins, we covered this in detail the Selling Event Tickets Without Eventbrite in 2026 post.
Plugin pricing at a glance#
A quick comparison of what the full-featured setup costs across popular options:
| Plugin | Full-Feature Price | Uses WooCommerce Checkout | Includes |
|---|---|---|---|
| Evenzo – Events Manager for WooCommerce | Free (WordPress.org) | Yes | Everything in one plugin: calendar, recurring events, seating charts, QR check-in, PDF tickets, dynamic pricing, waitlists |
| The Events Calendar + Tickets Plus + Pro | $198–300/year | Yes (with Plus add-on) | Calendar, recurring events, WooCommerce ticketing. Seating charts and dynamic pricing not available |
| Events Manager Pro | $99.95/year | Via separate $79/year add-on (poorly rated) | Own booking/payment system, recurring events, waitlists. No seating charts |
| FooEvents (full stack) | $250–350/year | Yes | Base ticketing + add-ons for seating, multi-day, PDF customization |
| WP Event Manager | Free–$39/plugin | Via add-on | Modular system, pay per feature |
Evenzo is our plugin; we built it because we saw gaps in what was available, particularly around seating charts, dynamic pricing, and browser-based QR check-in in a single install. It’s newer than the alternatives, so it doesn’t have the same community size or track record. Factor that in. It’s now free on WordPress.org.
Frequently asked questions#
Can I manage events in WooCommerce for free?#
Yes. Events Manager’s free version handles basic event creation, calendars, and registrations. The Events Calendar’s free tier is excellent for displaying events. For WooCommerce-integrated ticket sales with payment processing, most solutions require a premium version or add-on.
What payment gateways work with WooCommerce event tickets?#
Any gateway connected to your WooCommerce store works automatically: Stripe, PayPal, Square, bank transfers, cash on delivery. WooCommerce-native event plugins use your existing checkout, so there’s no separate payment configuration.
Can I generate PDF tickets with QR codes?#
Yes. Most premium WooCommerce event plugins generate PDF tickets. The ticket includes event details, attendee information, and a unique QR code for check-in. Customers access tickets from their My Account page, either displaying the QR code on their phone screen or downloading a printable PDF.
What’s the difference between WP Event Manager and Events Manager?#
They’re different plugins by different developers. WP Event Manager is a modular system where you buy individual add-ons (calendar, sell tickets, registrations). Events Manager by Marcus Sykes is a more complete free plugin with its own booking system. Events Manager Pro adds payments and advanced features. Neither uses WooCommerce checkout by default; both have separate WooCommerce bridge add-ons of varying quality.
Does WooCommerce event management work with the Block Checkout?#
Not all plugins support it. WooCommerce’s Block Checkout and HPOS (High-Performance Order Storage) are the current standards. Check specifically for compatibility before committing; older plugins may only work with the Classic Checkout.
Can I create an event calendar page on my WooCommerce store?#
Yes. Most event plugins provide either a shortcode, Gutenberg block, or both to add a month-view calendar to any page. Some also generate an automatic event archive with grid layouts. For full design control, create a custom page and use the shortcode or block to embed the calendar exactly where you want it.
How do I handle events with reserved seating?#
You need a plugin with a seating chart builder. Create sections (orchestra, balcony, general admission), add rows and seats, assign pricing categories, and link the chart to your event. Customers see an interactive map and select their seats at checkout. Not many WooCommerce event plugins offer this. Check the comparison table above.
Can I sell free event tickets through WooCommerce?#
Yes. Create a WooCommerce product priced at $0 and link it to your event. Customers go through checkout without paying but still get registered as attendees, with full ticket functionality including QR codes and check-in tracking.
How does pricing compare between event management platforms?#
Self-hosted WooCommerce plugins range from completely free (Evenzo on WordPress.org) to $49–350/year for premium options, depending on features needed. Third-party platforms like Eventbrite charge per-ticket fees (3.7% + $1.79 per paid ticket on their Flex plan). For stores selling more than a handful of tickets, self-hosted is significantly cheaper. We break down the full cost comparison in our guide to selling event tickets on WordPress.
The bottom line#
If you’re running a WooCommerce store and want to add events, you don’t need a separate platform. Your store already handles payments, customer accounts, and order management. A WooCommerce-native event plugin adds the event layer, dates, venues, calendars, ticket check-in, and PDF tickets, without duplicating what you already have.
Start by mapping out what your events actually need. Simple free events with RSVPs? A free plugin gets you there. Regular ticketed events with recurring schedules, seating charts, and door check-in? Pick something purpose-built for that.
Test on a staging site first. Run a few orders through. Scan some QR codes from your phone. The best way to know what fits your workflow is to try it.
If you want the all-in-one option with seating charts, dynamic pricing, recurring events, and browser-based QR check-in, check out Evenzo – Events Manager for WooCommerce. It’s free on WordPress.org.
Plugin we built for this
We didn't just write about it. We built something for it.
Keep reading

How to Sell Event Tickets on Your WordPress Site (2026 Guide)
You don't need Eventbrite or Ticketmaster to sell event tickets. If you have a WordPress site, here's how to set up ticket sales from your own domain.
Read more →
How to Price Event Tickets: 7 Proven Strategies (2026)
Most event organizers guess at ticket pricing and leave money on the table. Here are 7 pricing strategies with real numbers that fill seats and maximize revenue.
Read more →
Selling Event Tickets Without Eventbrite (2026 Guide)
Eventbrite takes up to 9.95% per ticket. Your WooCommerce store already handles payments and accounts. We tested 6 event plugins to find what actually replaces it.
Read more →